Tuesday 22 May 2012

Notes and Attachments


Before we begin discussing on this related list, it is important to understand that Notes and Attachments are two separate object ‘Note’ and ‘Attachment’. You could check this out in Workbench or any Force IDE tools.

Though Salesforce uses NotesAndAttachment but it is read-only object contains all notes and attachments associated with an object.  

Notes and Attachments are available for Standard Controller by default and when we create a custom object than in that case you have to click on the checkbox to make it available.

Once this is done you can use it in any object by adding it in a Page Layout related list. This is a basic functional Idea of this object.

Customization:-

As we know that most of the objects in Salesforce can’t be always used in the way it is designed. So in some cases we need to customize it and use it the way we want to.

First way would be to display the section without using it in a related list tab in a Visual Force page so that you could add your own buttons and links.

For this simply create a Page Block table and use it in related lists.


VF Page related list looks like:-


Sample Code:-

<apex:page standardController="Account">
<apex:form >

<apex:pageblock title="Notes and Attachments" >
                <apex:pageBlockTable Value="{!Account.NotesAndAttachments}" var="item" columns="4" >
                                                                 
                                <apex:column HeaderValue="Title"  >    
                                                <apex:outputLink value="/{!item.id}" id="the_link" rendered="{!NOT(Contains(item.Title,'IN_'))}">
                                                <apex:outputField  value="{!item.Title}" /> 
                                                <apex:outputField  value="{!item.Title}" /> 
                                                </apex:outputLink>
                                </apex:column>
                                <apex:column HeaderValue="Last Modified Date" >
                                                <apex:outputField  value="{!item.LastModifiedDate }" /> 
                    </apex:column>
                                <apex:column HeaderValue="Created By" >
                                                <apex:outputField  value="{!item.Createdbyid }" /> 
                                                               
                                </apex:column>
                                                  
                </apex:pageBlockTable>
</apex:pageblock>

</apex:form>
</apex:page>

This was one of the way to use Notes and Attachments.

Let’s suppose there is a requirement when a user should not be allowed to Edit/delete/create new notes and attachment based on the opportunity stage value.

Let’s take Notes first:- It is nothing but a text associated with a custom object or any standard objects created in Salesforce.

Attachment: - It is a file which you would like to be associated with any Standard object.

So where do we write these triggers because they are standard object yet it is not displayed in the list of Standard Objects.

Even I had to look for it and find how to get it done.

Here is the solution, first thing you could use Force.com IDE there you can access the objects (Note/Attachment) directly and then write a trigger on the same. But what if you want to add the trigger on the Salesforce org itself. Well! For that you would need to use any custom objects and click on new trigger.

Once that is done, You could easily paste the code directly and it should work fine. Which means replace the object name in the syntax and it should work.

Code Sample:-

trigger DisablelinksonAttacments on Attachment(Before insert,before update,before delete) {

   
    //List<Attachment> atts = Trigger.new;
    List<Opportunity> opp = new List<Opportunity>();
   
    List<Id> OppIds = new List<Id>();
    String oppKeyPrefix = Opportunity.sObjectType.getDescribe().getKeyPrefix();
    List<Opportunity> oppRecs = new List<Opportunity>();
    Map<Id,String> oppByStage = new Map<Id,String>();
   
    if (Trigger.isDelete) {
        // FOR Delete
        // Get all the parent Ids from the attachment for Opportunity
        for(Attachment atItem: Trigger.old) {
            String ParentId = atItem.ParentId; 
            if(ParentId.startsWith(oppKeyPrefix)) {
                OppIds.add(ParentId);
            }
        }
    } else { // FOR Insert and Update
        // Get all the parent Ids from the attachment for Opportunity
        for(Attachment atItem: Trigger.new) {
            String ParentId = atItem.ParentId; 
            if(ParentId.startsWith(oppKeyPrefix)) {
                OppIds.add(ParentId);
            }
        }
    }
    If (OppIds.size() > 0) {
       
        oppRecs = [select Id,StageName from opportunity where id in: OppIds];
        for(Opportunity o:oppRecs)
        {
            oppByStage.put(o.id, o.StageName);
           
        }
    }
   
    if (Trigger.isDelete) {
        // FOR Delete
        for(Attachment a:Trigger.old){
            if (oppByStage.containsKey(a.ParentId) )
                if (oppByStage.get(a.ParentId) == 'Closed Lost') {
                    a.addError('Opportunity has been Lost. Modification not allowed!');
                }
        }
    } else {
        // FOR Insert and Update
        for(Attachment a:Trigger.new){
            if (oppByStage.containsKey(a.ParentId) )
                if (oppByStage.get(a.ParentId) == 'Closed Lost') {
                    a.addError('Opportunity has been Lost. Modification not allowed!');
                }
        }
    }
}

You can use the same code for Notes as well, by simply replacing the word Attachment as Note and doing some minor changes of Variables.

I hope this helps you in your understanding of these objects.
Feel free to write in at Forced2code@gmail.com for your views and suggestion. 


Friday 18 May 2012

Wrapper Class

It says in book a Wrapper class is nothing but something that “WRAPS” an object/data type etc so that it can be used. So this means that an object/data type can be extended to perform tasks that wouldn’t be possible otherwise.
When you start your code in Apex you would find that it is really similar to java. Even there we have a wrapper classes to Wrap primitive data type. Example:- An example of this would be assignment of decimal value to a string variable. 

String doubleString = String.valueOf(3.14159);


Coming back to Apex, this is what it says in Salesforce Apex PDF

Now what is a Wrapper Class?!

A class that abstracts common functions such as logging in, managing sessions, and querying and batching records. A wrapper class makes integration more straightforward to develop and maintain, keeps program logic in one place, and affords easy reuse across components.

Examples of wrapper classes in Salesforce.com include theAJAX Toolkit, which is a JavaScript wrapper around the Salesforce.com Web services API, wrapper classes such as Critical Section in the CTI Adapter for Salesforce CRM Call Center, or wrapper classes created as part of a client integration application that
accesses Salesforce.com using the Web services API.

So let’s take an example for this:-

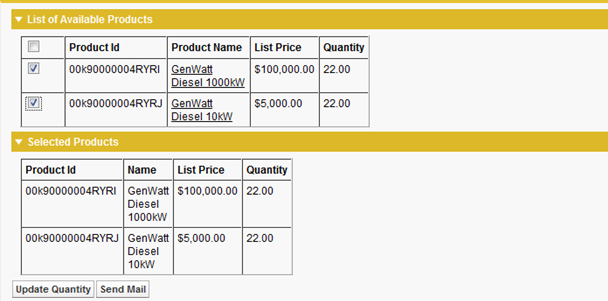
In my opportunity page I would like to show the details of products, and when a user selects the listed record it should be appended in the selected section. Based on the selected records we could perform any task we want by clicking on the command buttons. 

How the page Looks like :-

Wrapper Class - Image 1


When you selected the items in the “List of Available Products”, it would automatically update the below Selected Products. 


Visualforce Page

<apex:page standardController="Opportunity" extensions="Displayprodsinopprtunity" Tabstyle="Opportunity" >
<script>
function checkAll(cb)
{
var inputElem = document.getElementsByTagName("input");
for(var i=0; i<inputElem.length; i++)
{
if(inputElem[i].id.indexOf("checkedone")!=-1)
inputElem[i].checked = cb.checked;
}
}    
</script>
<apex:form >
<apex:pageBlock >
<apex:pageBlockSection Title="List of Available Products" id="ListProd">
<apex:dataTable value="{!Products}"  var="a" columnswidth="50px,50px" cellpadding="4" border="1">
<apex:column >
<apex:facet name="header">
<apex:inputCheckbox >
<apex:actionSupport event="onclick" action="{!GetSelected}" onsubmit="checkAll(this)" rerender="Selected_PBS"/>
</apex:inputCheckbox>
</apex:facet>
<apex:inputCheckbox value="{!a.selected}" id="checkedone">
<apex:actionSupport event="onclick" action="{!GetSelected}" rerender="Selected_PBS"/>
</apex:inputCheckbox>
</apex:column>
<apex:column headervalue="Product Id" value="{!a.prd.Id}" />
<apex:column headervalue="Product Name" value="{!a.prd.PricebookEntry.Product2Id}" />
<apex:column headervalue="List Price" value="{!a.prd.ListPrice}" />
<apex:column headervalue="Quantity" value="{!a.prd.Quantity}" />
</apex:dataTable>
</apex:pageBlockSection>
<apex:pageBlockSection Title="Selected Products" id="Selected_PBS">
<apex:dataTable value="{!SelectedProducts}" var="s" columnswidth="50px,50px" cellpadding="4" border="1">
<apex:column headervalue="Product Id" value="{!s.Id}" />
<apex:column headervalue="Name" value="{!s.PricebookEntry.Name}" />
<apex:column headervalue="List Price" value="{!s.ListPrice}" />
<apex:column headervalue="Quantity" value="{!s.Quantity}" />
</apex:dataTable>
</apex:pageBlockSection>
<apex:commandButton action="{!updateQuantity}" ReRender="ListProd"  Value="Update Quantity"/>
<apex:commandButton action="{!SendMail}" ReRender="ListProd"  Value="Send Mail"/>
</apex:pageBlock>
</apex:form>

</apex:page>


Controller Class

public class Displayprodsinopprtunity
{

//This is where we have defined the Wrapper Class. 
    public class OpportunityLineItemwrapper
    {
        public OpportunityLineItem prd{get; set;}
        public Boolean selected {get; set;}
        public OpportunityLineItemwrapper(OpportunityLineItem a)
        {
            prd = a;
            selected = false;
        }
    }
// This is the Wrapper Name for the object Opportunity Line Items
    List<OpportunityLineItemwrapper> OppList = new List<OpportunityLineItemwrapper>();
    List<OpportunityLineItem> selectedProducts = new List<OpportunityLineItem>();

//Defines a Map to store all items selected based on the ID from the  ID from the URl.
    Map<Id,OpportunityLineItem> selectedProductsMap = new Map<Id,OpportunityLineItem>();
   

    public Displayprodsinopprtunity(ApexPages.StandardController controller) {

    }
        
    public List<OpportunityLineItemwrapper> getProducts() {
        ID str = ApexPages.currentPage().getParameters().get('ID');         
        OppList.clear();
        
        for(OpportunityLineItem a : [Select Id,Quantity,
ListPrice,PricebookEntry.Product2Id,
 PricebookEntry.Name From OpportunityLineItem
 where Opportunity.id=:str]){
            
            OpportunityLineItemwrapper opplineItem = new OpportunityLineItemwrapper(a);            
            if (selectedProductsMap.get(a.Id) != null)
                opplineItem.selected = true;

            OppList.add(opplineItem);        
        }
        return OppList;
    }
    
    public PageReference getSelected() {
        selectedProducts.clear();
        for(OpportunityLineItemwrapper accwrapper : OppList)
        if(accwrapper.selected == true) {
            selectedProducts.add(accwrapper.prd);
            selectedProductsMap.put(accwrapper.prd.id, accwrapper.prd);
        }
        return null;    
        
    }
    
    public List<OpportunityLineItem> GetSelectedProducts()  {
        if(selectedProducts.size()>0)
return selectedProducts;
        else
return null;
    }    

    public void updateQuantity() {
        List<Id> SelectedIds = new List<Id>();
       
        for(OpportunityLineItem litem: selectedProducts) {            
             OpportunityLineItem updateQuantity = new OpportunityLineItem (Id=litem.Id,Quantity=22); 
             Update updateQuantity ;            
        }      
    }
    
    
     public PageReference SendMail() {
     
Set<Id> SelectedIds = new Set<Id>();
List<Product2> ContactMailID = new List<Product2> ();

for(OpportunityLineItem litem: selectedProducts) {        
SelectedIds.add(litem.PricebookEntry.Product2Id);
}
ContactMailID =[Select ID,Product_Mail__c,productcode 
from Product2 where ID in:SelectedIds];

Set<String> EmailID = new Set<String>();
For(Integer i=0; i < ContactMailID.size(); i++) 
{  
EmailID.add(ContactMailID[i].Product_Mail__c);   
}       
List<contact> SendMail = new List<contact> ();
SendMail= [Select Email from Contact where ID in:EmailID];
Messaging.SingleEmailMessage mail = new Messaging.SingleEmailMessage();
String[] toaddress = new String[]{};        
For(Integer i=0; i < SendMail.size(); i++) { 
toaddress.add(SendMail[i].Email);
}       
mail.setToAddresses(toaddress);
mail.setsubject('You have got a mail');
mail.setPlainTextBody('Please check'+ String.valueOf(SelectedIds));
Messaging.sendEmail(new Messaging.SingleEmailMessage[] { mail });
return null;
    }
}


I hope this helps in understanding the wrapper class to certain extent.